GUEST BLOG POST BY KITTY WILKIN OF NIGHT QUILTER
There’s a quilting style near and dear to my heart that often gets a bad rep. I often hear, My brain hurts!… or… it’s too hard for me!… or… Now I have to remove all this paper. Le sigh. That last one all but gave it away, but yes, foundation paper piecing is one of my favorite quilting techniques. I love it. There is no other method that can result in such crisp, clean lines, perfect points, and fabricly composed images of literally ANYthing with such ease. Many patterns are perfect for using up small scraps, too. With foundation paper piecing, you can create two identical blocks without too much muss or fuss about seam allowances. Once you wrap your brain around the process, learn a few tricks of the trade, and put in your few hours of practice, foundation paper piecing is a fabulous skill anyone can add to their fabric-love repertoire, as it opens a whole new world of quilting and fabric play.
Hi, I’m Kitty! I am a quilter, designer, photographer, and the busy mom-blogger behind Night Quilter. When Giuseppe invited me to write a guest post on the Andover blog, I knew I wanted to spread my love of foundation paper piecing. Today I’m excited to share a basic tutorial for how to foundation paper piece, some tips along the way to help you set yourself up for success, a fun peek at how to fit fussy cutting into your FPP projects, and some links to extra surefire tips to ensure your foundation paper piecing journey is smooth sailing.
When I was first getting started with foundation paper piecing, once I wrapped my brain around the fact that I was sewing something backwards while looking through a mirror, it all clicked. I’m a very spatial person, so once I could visualize that the picture was being created on the BACK, I was fine. Yes, the lines along which you sew will be on the back, or wrong-side of your sewn design. Think about that for a minute, and then let’s begin. Take your time, and have FUN!
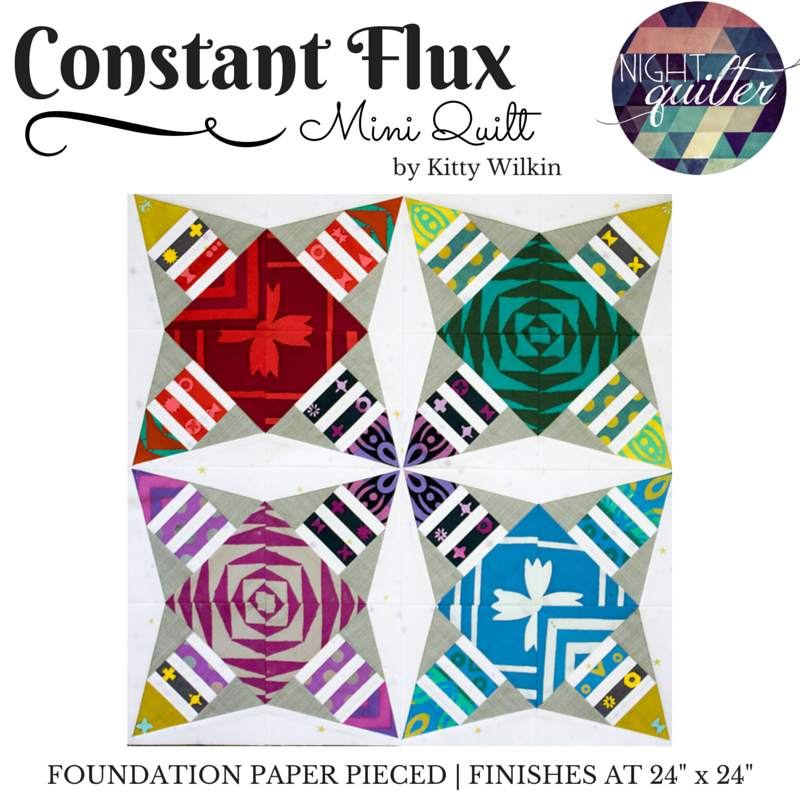 For this tutorial, I’m using my newest pattern Constant Flux, which is a geometric foundation paper piecing pattern perfect for beginners or advanced FPPers alike. You can buy the pattern in my pattern stores here (Craftsy or Payhip if you’re in the EU), or you can apply these methods to any foundation paper piecing project you choose! Let’s get started!
Preparation
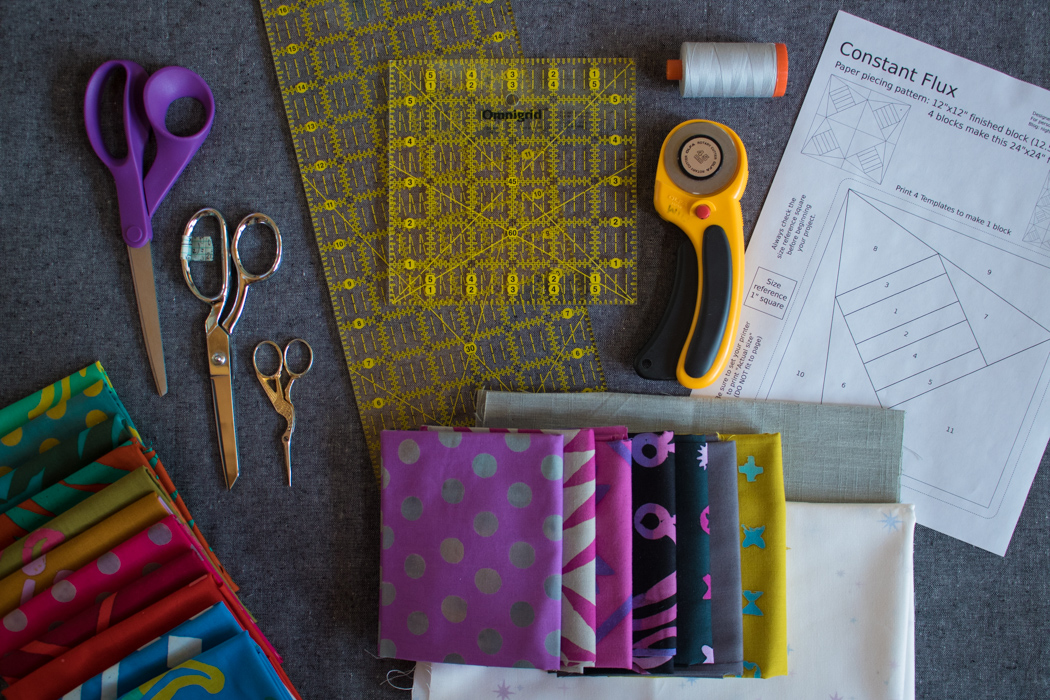
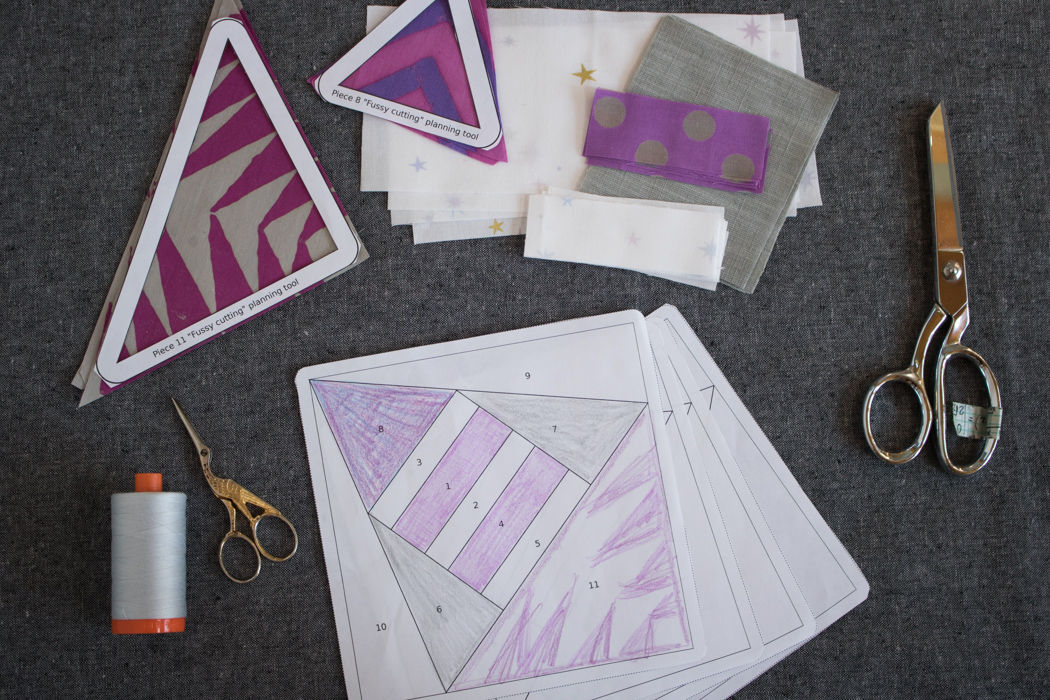
Assemble your tools. You will need:
– pattern & paper (I use regular printer paper. Some prefer velum or tracing paper, but I really like the sturdy foundation provided by regular 100% recycled printer paper)
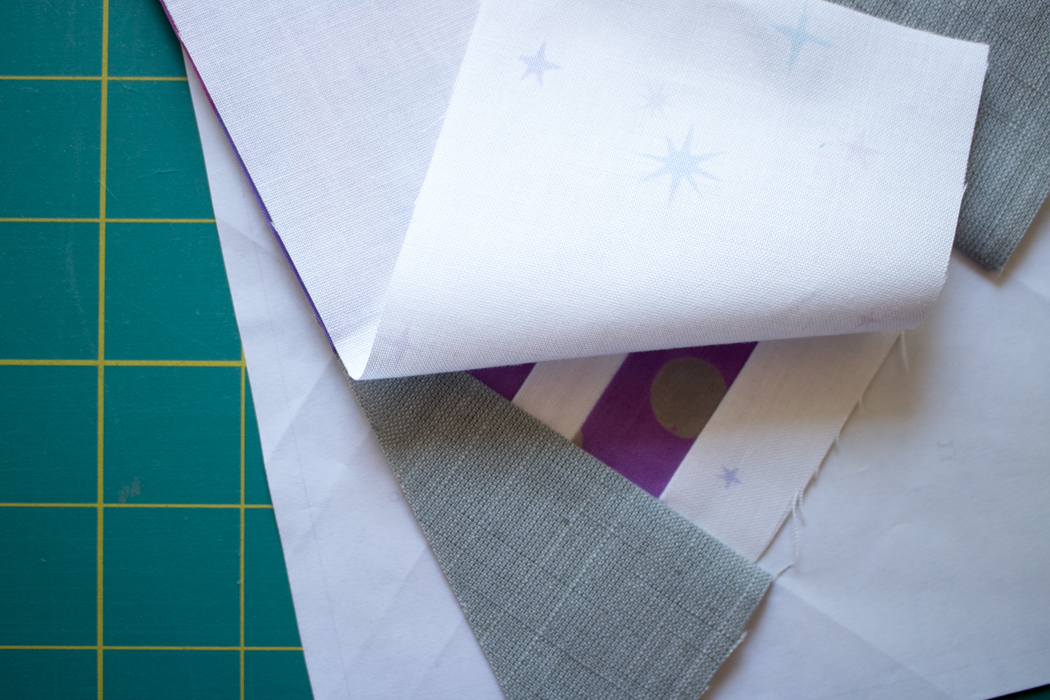
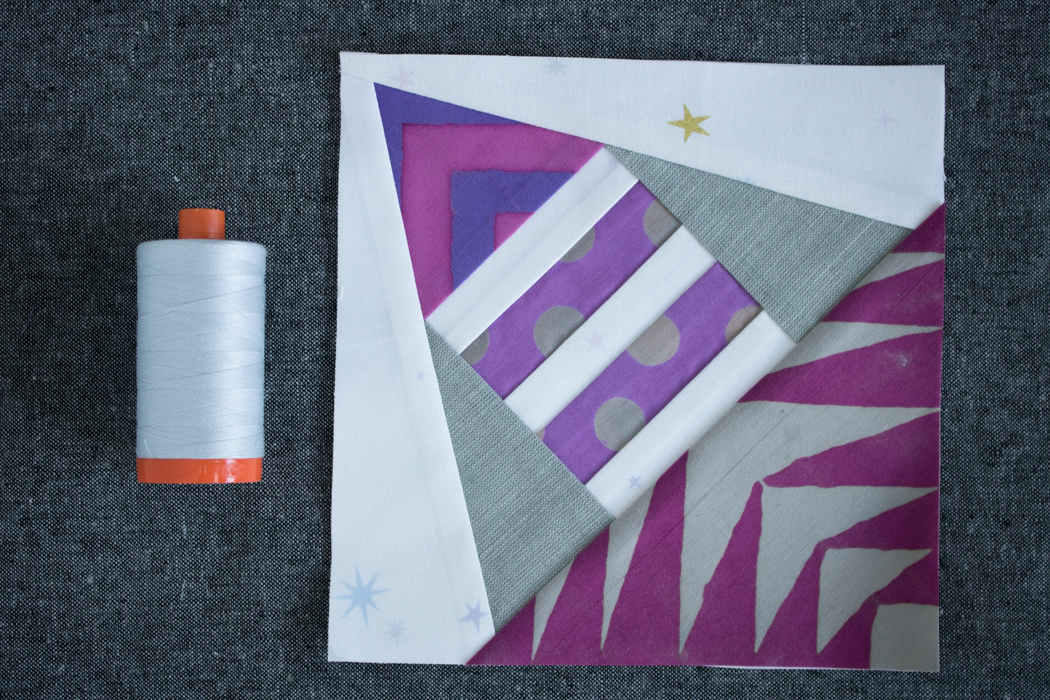
– fabric (I created Constant Flux with Handcrafted Patchwork by Alison Glass in mind, with Lizzy House’s Constellation from her Whisper Palette as a background, and some Andover Textured Solid in grey to round it out. Thank you, Andover Fabrics for the consistently gorgeous fabrics!)
— thread (I do all of my piecing with Aurifil 50wt 2600-Dove, my panacea thread)
– rotary cutter and mat
– scissors (be sure to use non-fabric scissors to cut out your pattern. I suggest having fabric scissors, craft scissors, and small scissors for trimming threads)
– ruler (add a quarter rulers work well, but so do any quilting rulers with a 1/4″ measure)
– iron and pressing surface
– sewing machine (I love my Bernina 560, and use my walking foot for just about everything except sewing curves)

Print your pattern of choice with your printer set on “Actual Size” and check the scale with your ruler. ALWAYS check to make sure the pattern is printed to the correct scale before beginning to sew. Trust me, this step is as important as knitting a swatch before beginning to knit a sweater. Just do it or your sleeves will end at your elbows!
Cut out the pattern pieces using craft scissors (not your precious fabric scissors!). Many patterns have a dotted line showing a 1/4″ seam allowance on the pattern. Be sure to check that the seam allowance is included, and if it isn’t, be sure to add it on before you cut.
Depending on the pattern, some people like to color their pattern with colored pencils to help with accurate fabric piecing. I usually only do this for complicated patterns or when I am using different fabric colors than indicated on the pattern, but you are welcome to get out the colored pencils and do some coloring here if you want! There’s a coloring sheet included with my Constant Flux pattern, and with the potential for endless color play, gradients, and movement, coloring would definitely be a helpful step. Once you have your colors chosen on your coloring page, be sure to transfer those colors to each pattern template. Remember that the pattern templates are mirror images of the final pattern (which doesn’t matter with symmetrical patterns like Constant Flux, but WOULD matter for asymmetrical patterns).
Cutting Fabric
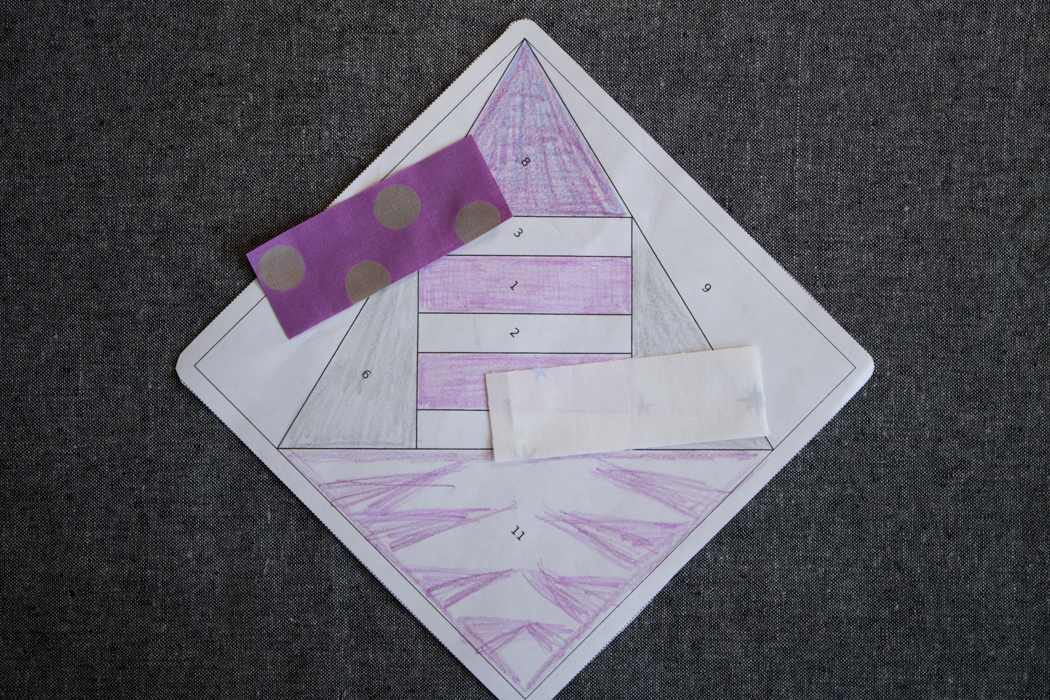
Once your pattern is all planned out, it’s time to add fabric! Often times, I’m a cut-as-you-go kind of foundation piecer. But sometimes, when a pattern is particularly geometric like this one, and I want to meticulously cut (called fussy cutting by most folks) some of the pattern pieces, I do my fabric cutting before getting started.
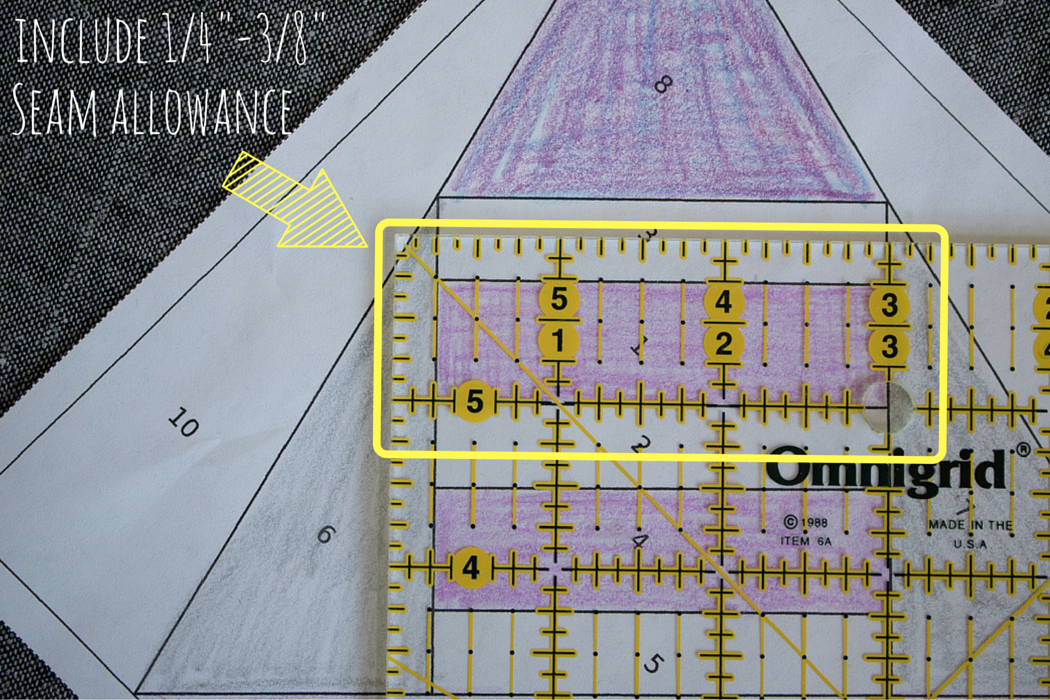
To determine how large you should cut each fabric piece, lay your ruler on top of your pattern template, with a ¼” (or if you’re a beginner or don’t mind a bit of extra fabric usage to ensure accuracy, a ⅜”) seam allowance on all sides. You can quickly cut the necessary rectangles of fabric using your rotary cutter and ruler, saving time and fabric in the process. I used this method to cut all of my fussy cut strips, too, just making sure to keep the desired motif centered within the pattern piece.
For Constant Flux, here are the sizes of fabric that can be precut for each piece on the template:
| Piece # on Template | ¼” seam allowance (Pros) | ⅜” seam allowance (Beginners) |
| 1, 4 | 1 ¼” x 3 ¼” | 1 ½” x 3 ½” |
| 2, 3, 5 | 1” x 3 ¼” | 1 ¼” x 3 ½” |
| 6, 7 | 3 ½” x 4”* | 3 ½” x 4” * |
| 8 | use template | use template |
| 9, 10 | 7 ½” x 3 ½”* | 7 ½” x 3 ½”* |
| 11 | use template | use template |
* Note that the rectangles cut for 6 & 7 and 9 & 10 are large enough to cover both triangular pieces. ie., one 3 ½” x 4” rectangle will be enough fabric to cover both piece 6 and piece 7.
Having a stack of pieces ready to go makes the foundation paper piecing process go much more quickly, but always be sure to double check your first piece cut to make sure it covers the intended piece plus a seam allowance on all sides before cutting all of your fabric for a project!
Accuracy tip: Note that the lines on the pattern template should be facing the opposite direction as the right side of the fabric (read that again and let it set in). With the pattern template with lines face up, be sure to cut with the wrong side of your fabric facing up. If your pattern is symmetrical or fabric doesn’t have a wrong side, you don’t have to worry about this detail.
Incorporating Meticulous Cutting into Foundation Paper Piecing
When I first set eyes on Handcrafted Patchwork by Alison Glass, the large scale designs captured my attention. I knew that they needed to play a lead role in this pattern, and meticulous cutting helped make that so.
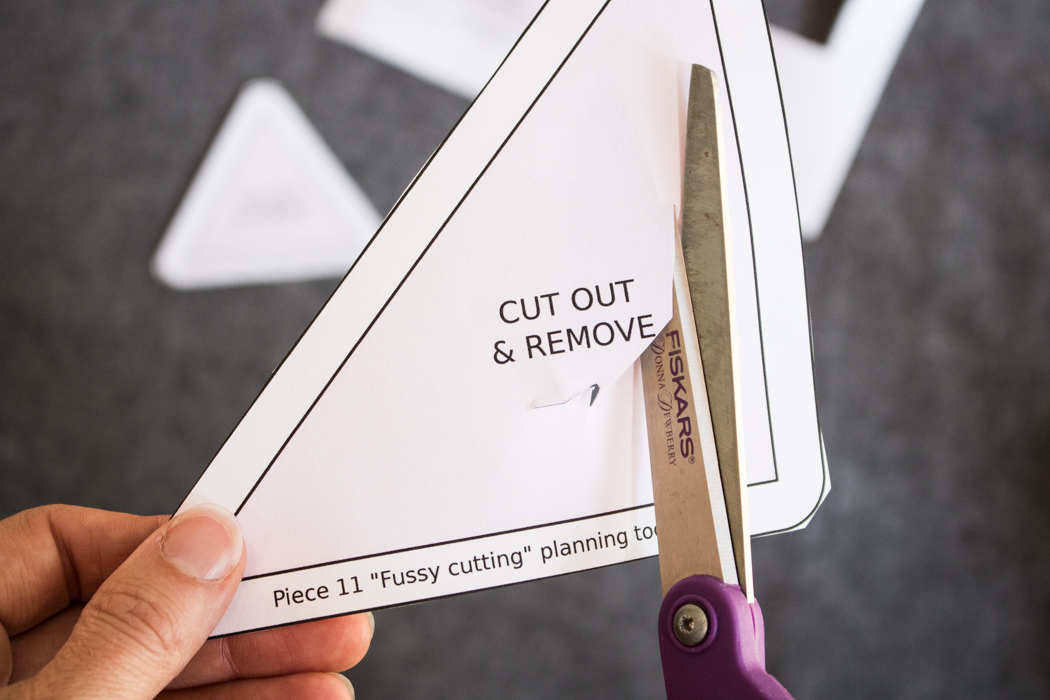
Some foundation paper piecing patterns include fussy cutting planning tools in the pattern, but it’s easy to make your own, too. Simply print an extra page of each template piece, mark the individual pattern piece you’d like to fussy cut, trace a ⅜” border around it, and cut it out. Cut out the center piece as well, which will give you a window to help you plan your fabric placement.
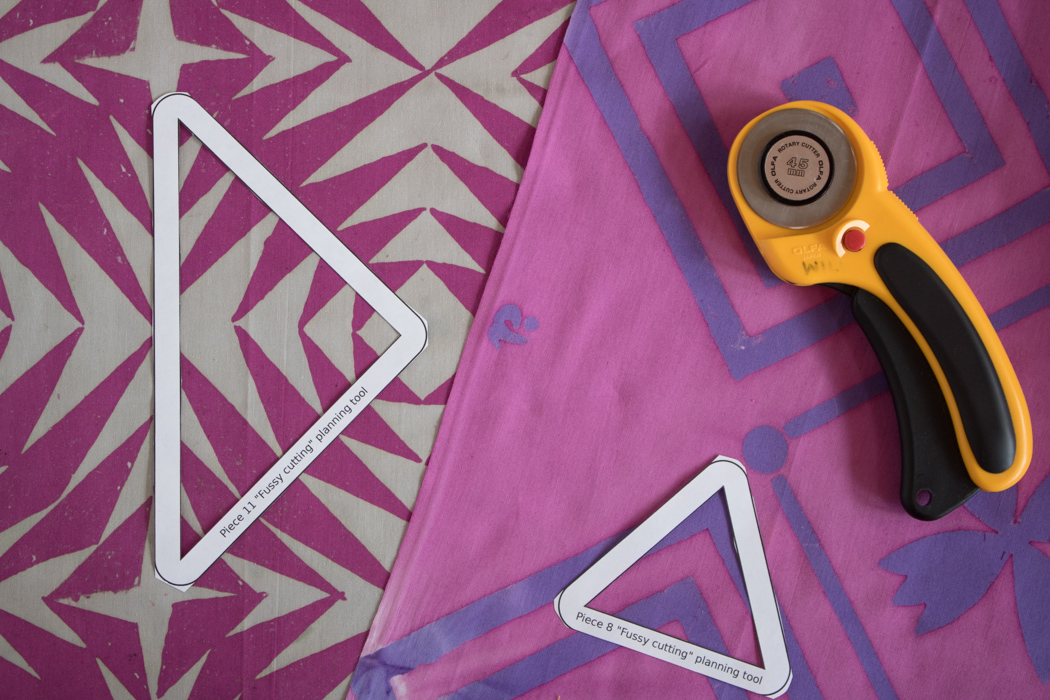
Play around with your pattern pieces on the fabric, choosing a little window of the fabric design motif that will work well in repeat. Once you identify the design you want, cut your first piece. Hold the template firmly and carefully in place and trace around it, cutting the fabric with scissors or a rotary cutter and ruler once marked. I like to live on the edge, so I VERY CAREFULLY rotary cut around the edges of each piece. You know yourself best. If this method is asking for a trip to the ER, just take the time to trace and scissor cut each piece. Then, find as many exact repeats as you need for the pattern, and cut away. One of the charms to Handcrafted Patchwork is that it’s handcrafted, so every piece, while containing the same design element, may be slightly different. That’s ok, and is part of the fun dichotomy found with the Constant Flux pattern. Constant = unchanging, the same (like repeat fussy cut elements!). Flux = changing (like the movement elicited in the design of the pattern).
Foundation Paper Piecing – Sewing Time!
Once you have your fabric pieces cut and all of your tools ready, it’s time to start stitching together each pattern piece! Before you sew, shorten the stitch length on your sewing machine significantly. I set mine to 1.2 so that the paper is extremely easy to remove at the end. If you are just getting started, I would recommend setting it at 1.5 or 1.6, since seam ripping 1.2 stitches is enough to send even the most dedicated sewist running for the hills. Once you get the hang of it, shorten down to 1.2 and your paper will melt off like butter on a hot day.
Grab your first foundation template and the fabric pieces you cut to fit spaces 1 and 2 on the pattern. Paper piecing is kind of like paint by number, but with sewing, and always in order. You start with piece 1, sew on piece 2, then piece 3, etc.
Beginner’s tip: When cutting fabric for paper piecing, it never hurts to be generous in your cutting. If you are just beginning, cut pieces that are amply large enough to cover the space and seam allowance and then some–lots of wiggle room. Yes, it may waste a bit more fabric, but it makes the process a lot smoother. To me, smooth (no seam ripper required) sewing is worth more than a few tiny scraps of fabric. Also, for some patterns, when you trim your seam allowances, any large pieces of excess fabric can be used for other pieces of the pattern. Go big!
Here’s where the spatial part comes in, so get ready. Remember, you are using the paper foundation to help you make the pattern on the back, as if you are looking through a mirror. Ready?
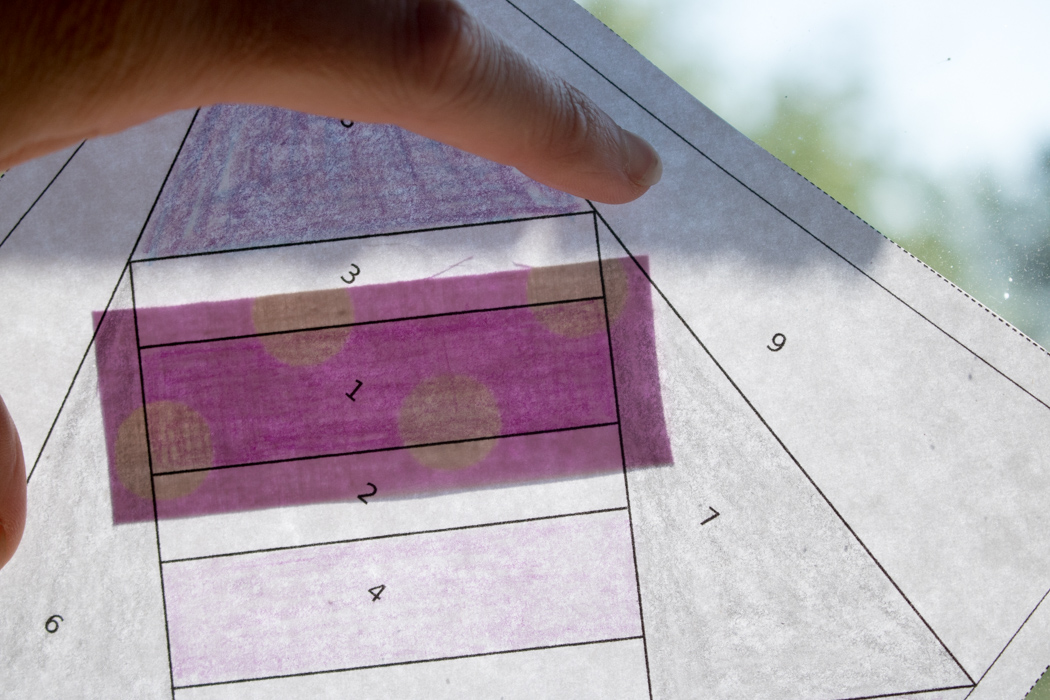
Place the fabric for piece 1 on the back of the paper, wrong side of the fabric facing you (against the paper). Hold it up to a window or a light-box to ensure the fabric fully covers the #1 space, plus seam allowances.
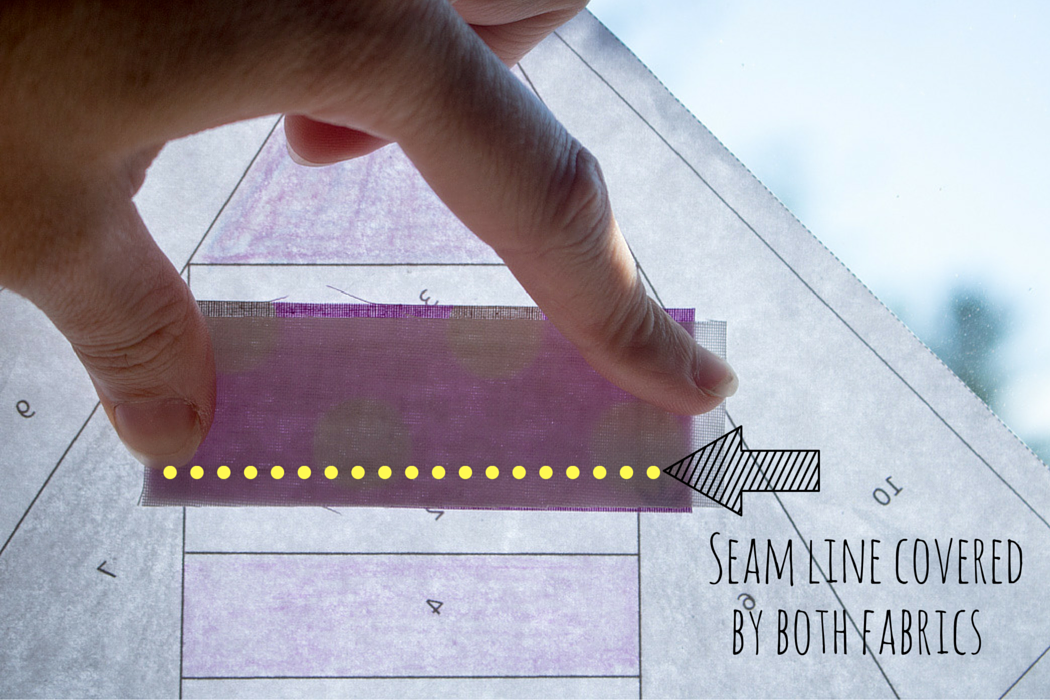
Holding fabric 1 in place, position the paper so that the printed side is away from you. Take the fabric scrap for space #2 and place it right side down, on top of fabric 1. Be sure the seam line between 1 and 2 is covered by both fabrics, holding up to the light if needed. The fabrics should now be right sides facing each other, and when you sew along the seam line and fold fabric 2 up, it should cover the #2 space plus seam allowances.
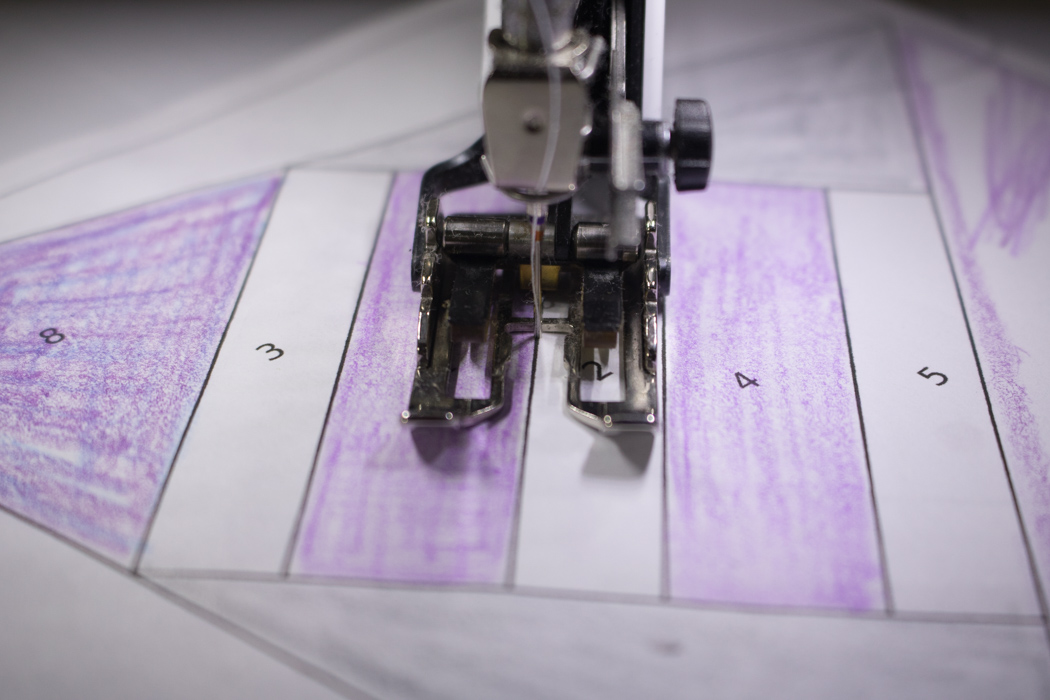
Holding both pieces of fabric in place, sew along the line between spaces 1 and 2, with the paper on top. Some people like to pin or even glue their pieces in place before sewing, since the fabric is underneath the paper. I personally just carefully hold them in place with my finger. I haven’t had a problem yet, and it’s one less step if that works for you.
Accuracy tip: Lower the needle by hand for the first stitch, ensuring that your sewing will be straight along the line. Back-stitch for 1-2 stitches at the beginning and end of each line to secure your threads.
Trim your threads. When you fall head over heels for foundation paper piecing, you’ll want to make a pretty thread catch to catch the scads of threads you’ll trim. Good news, I share a free tutorial how to make a great weighted thread catch & pincushion combo on my blog here.
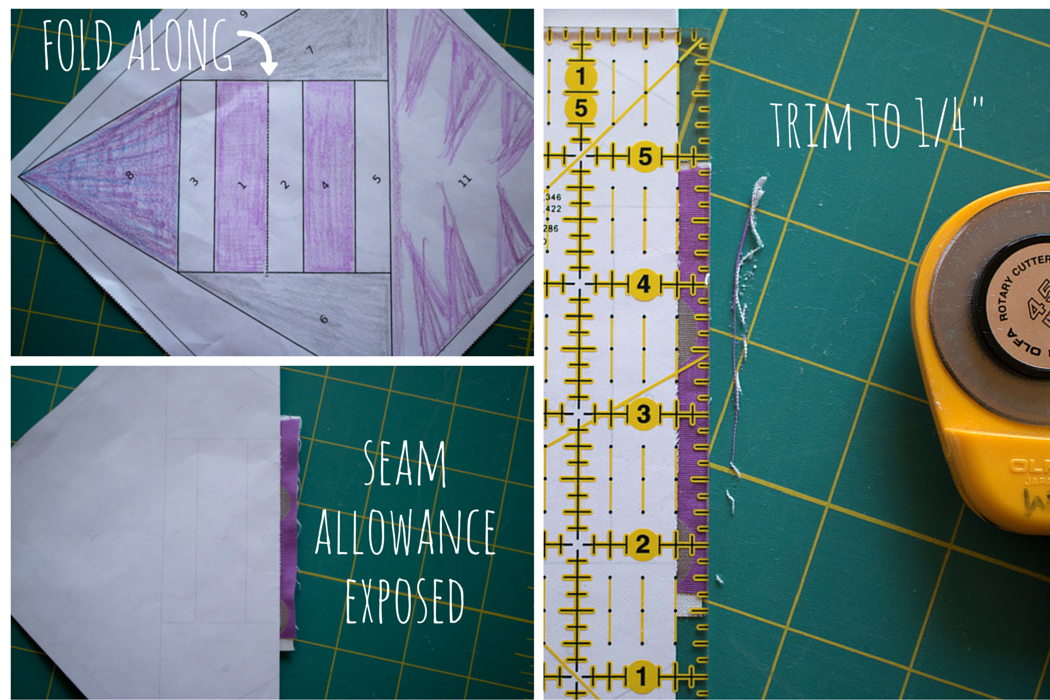
Next, fold the paper down along the seam you just sewed, with the seam allowance extended. Trim the fabric to 1/4″. With your precut rectangles, there might not be much if any seam allowance to trim off on this step, since you are able to line up your seam allowances *just right*. The larger the seam allowance for the piece of fabric you begin with, the more you will be trimming during this step.
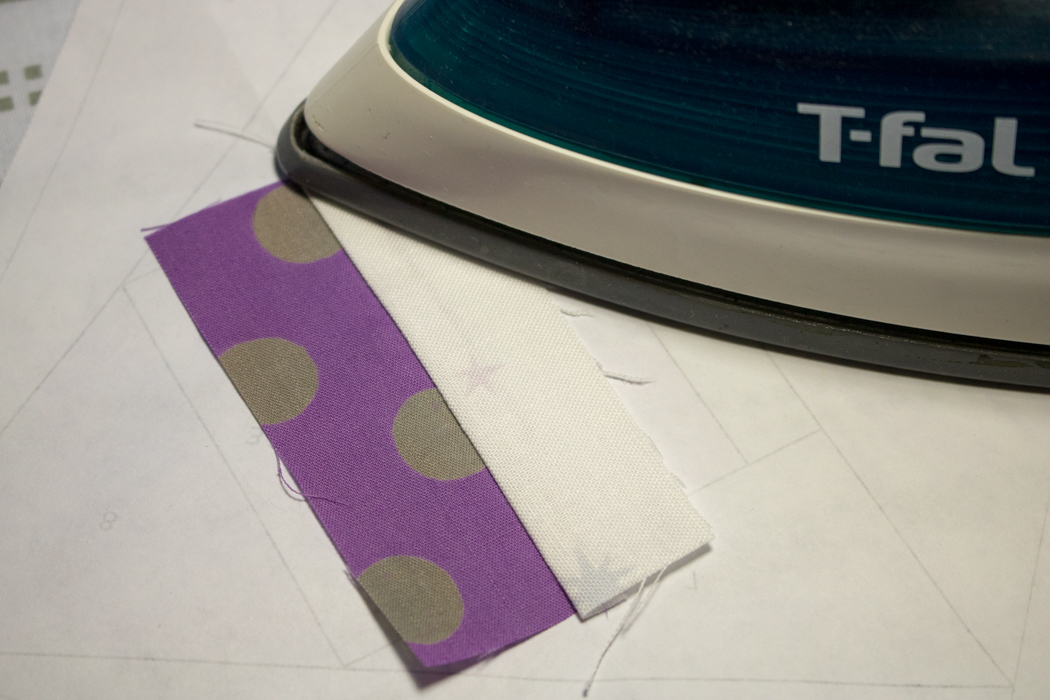
With the foundation paper flat and unfolded, press and set the seam with a hot iron (no steam). Finger press fabric 2 up to cover its space and press again.
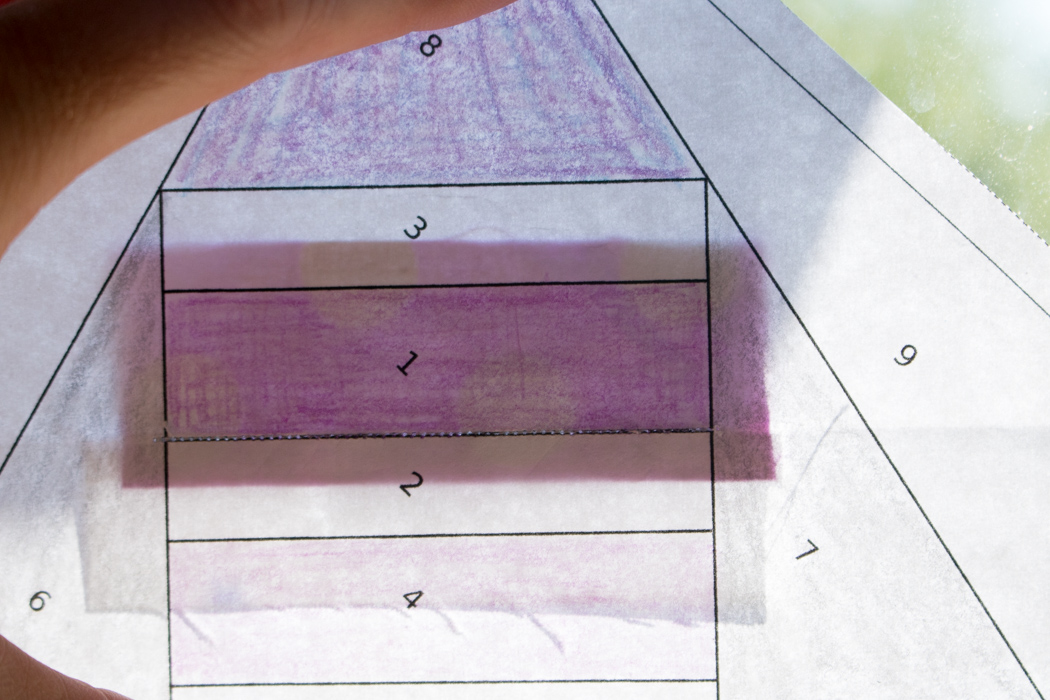
When you hold the paper up to the light, you should see that fabric 1 covers the #1 space and fabric 2 covers the #2 space, with seam allowances.
Continue this method for the rest of the pattern pieces. Cut, line up, sew, fold & trim, press. (Replace “cut” with “grab the proper fabric square” if you did all of your cutting ahead of time). Grab next fabric piece, line up, sew, fold & trim, press. Repeat. It won’t be long before you’re a pro!
Tips for Lining Up Seams
There are a few tricks of the trade that can help improve the consistent accuracy of your piecing, greatly reducing the number of frustrating bouts with your BFF seam ripper. This particular tip is also great for the frugal ones among us who just can’t bear to waste too much fabric despite the potential tiny stitch seam ripping that may ensue, and cut our pieces *just* right. Note that this works best for straight-forward seams, and not nearly as well for long, skinny, tricky angles.
Additional Resources for Tricky Angles: I touch upon some tricks for tackling tricky angles in my tutorial HERE, and Lee Heinrich from Freshly Pieced has a fantastic post on the Bernina blog with a tip that promises you will never tear out stitches again HERE. Trust me, it is entirely worth the read and paired with some solid practice in the basics of foundation paper piecing shared here, will change your paper piecing game for the better.
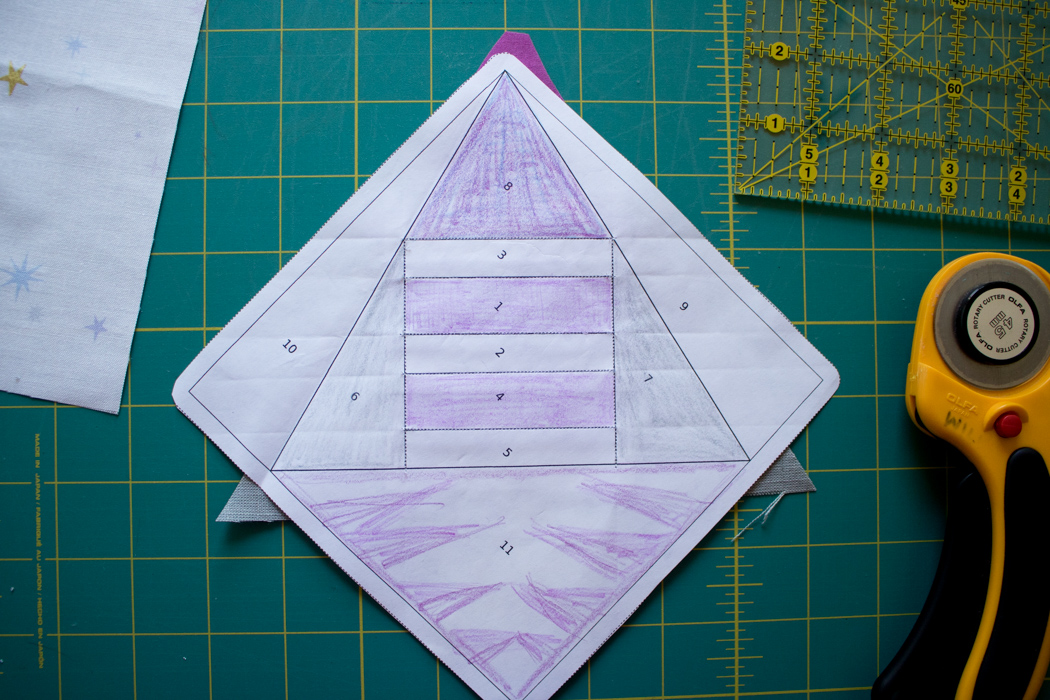
Back to my tip for accurately lining up seams. For this example, I have just finished sewing on pieces 1-8 and am getting ready to sew on piece 9.
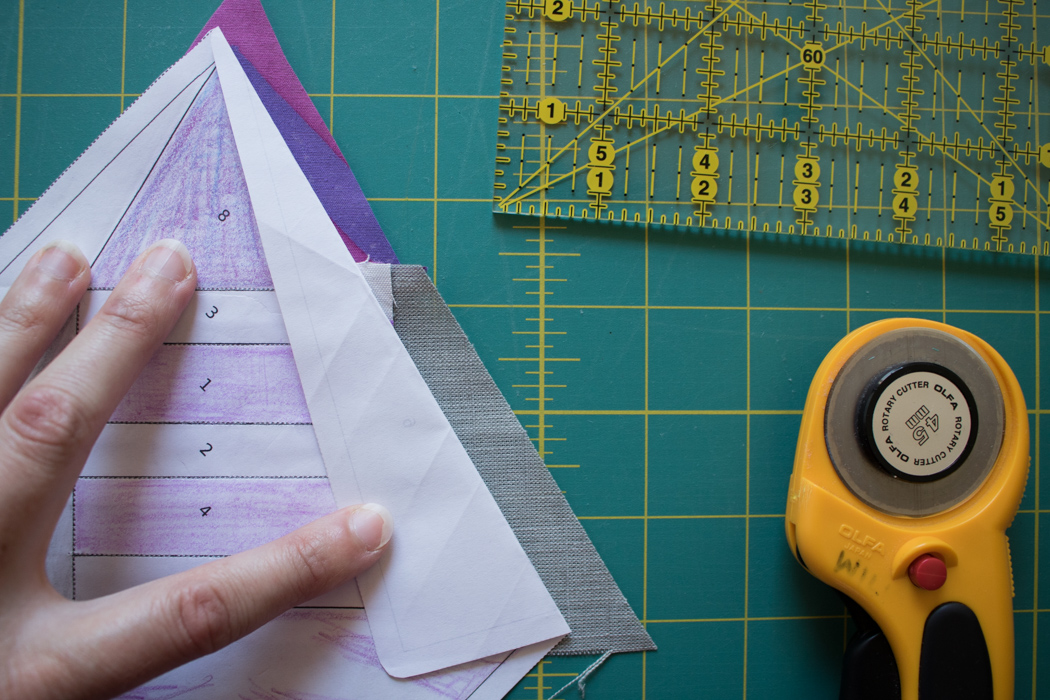
First, fold the paper along the seam line between pieces 1-8 and 9.
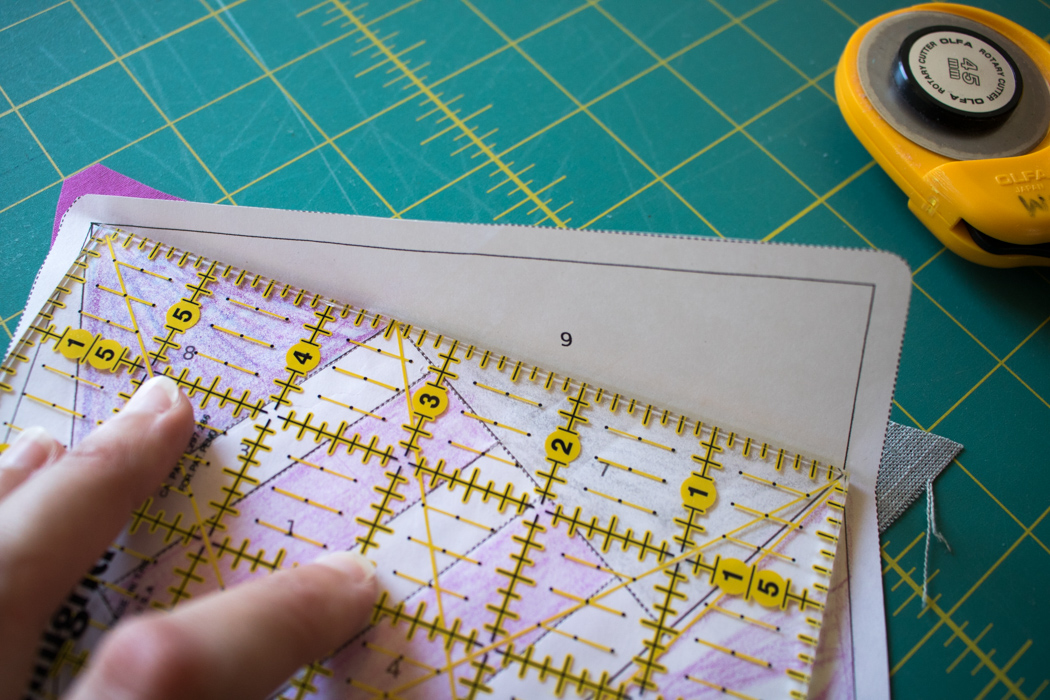
I like to use the edge of one of my rulers to ensure that I crease the paper exactly on the seam line. Line up your ruler’s edge with the seam line, hold it firmly in place, and fold the paper up along the edge of the ruler, creasing it with your fingernail.
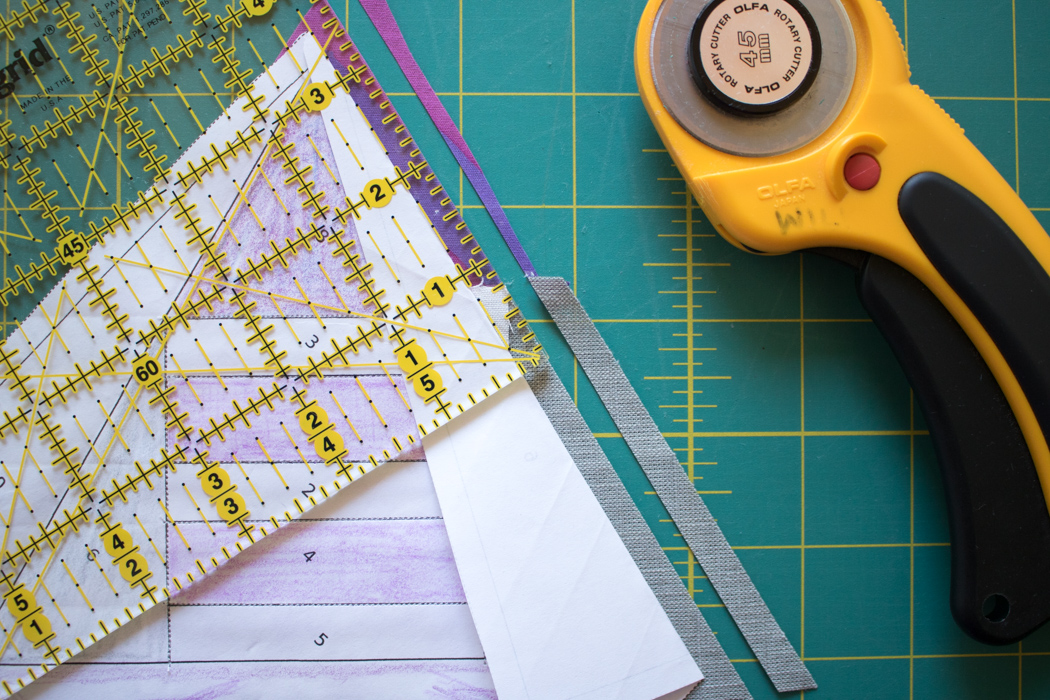
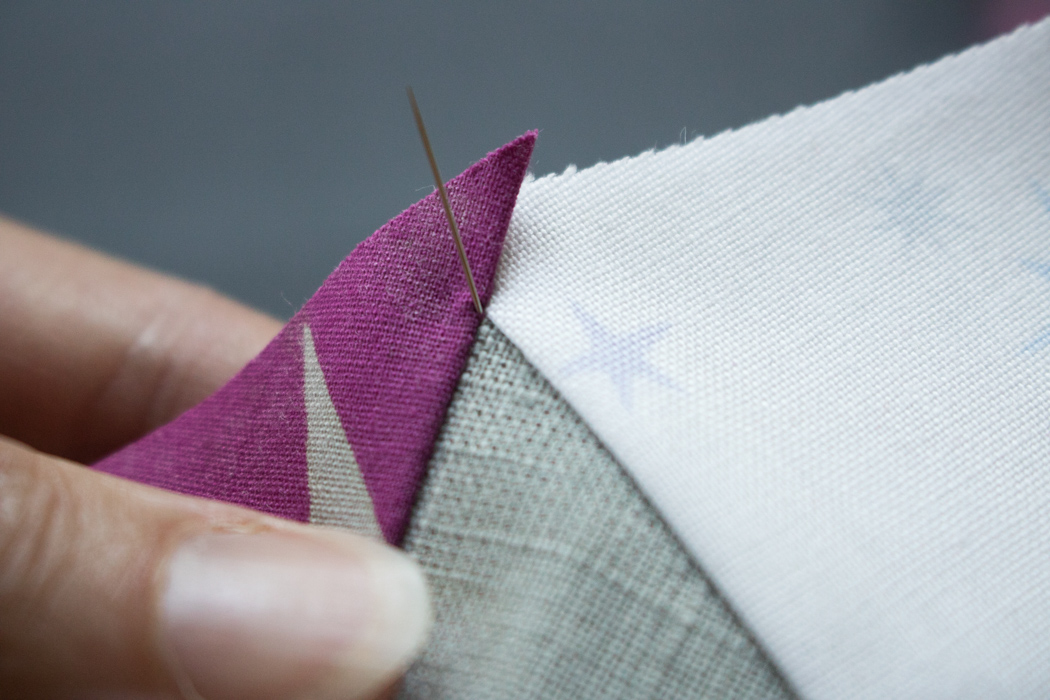
With paper folded over, trim the extending fabric to 1/4″ beyond the fold. This is defining your seam allowance and will give you an accurate edge with which to line up the edge of piece 9.
When lining up piece 9 (white) with the edge of the existing fabric edge, if you match the edges, the seam will be exactly 1/4″. Note that the right side of fabric 9 is facing the right side of the existing pieced block. Be sure to unfold the paper, hold the fabric pieces in place, sew along your seam line, and you’ve got as close to a perfect seam as you’re going to get! For this particular fabric in the pattern (just like with pieces 6 and 7), once you press it in place, trim the excess along the edge of the block and use the remaining piece for position 10.
Finishing & Joining Template Pieces
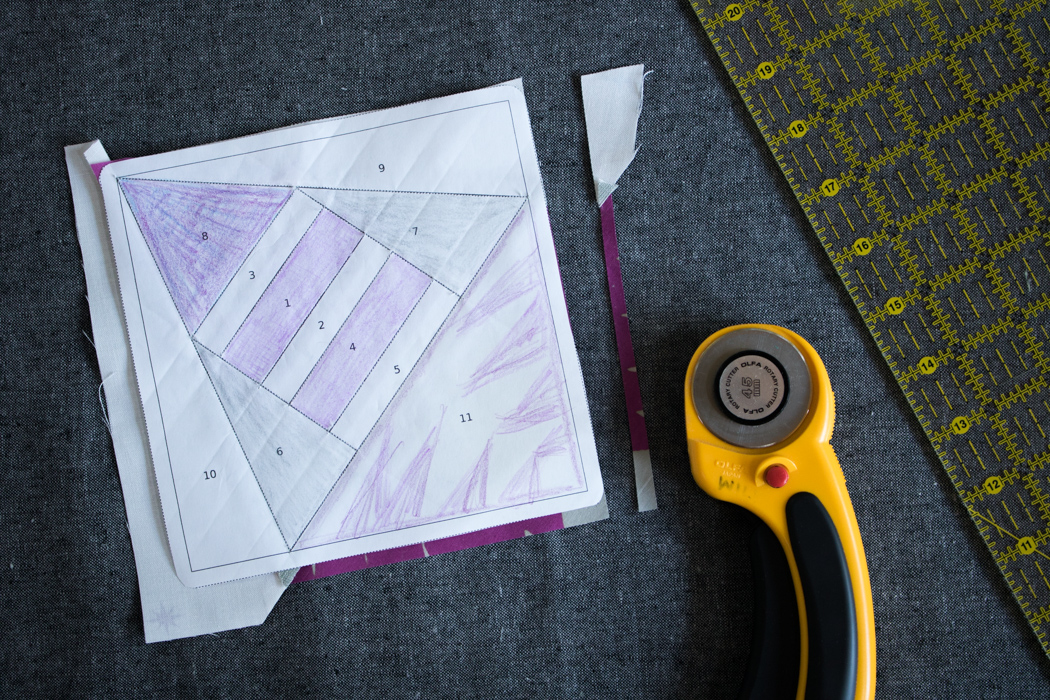
Once all of the fabric pieces for a particular template piece are sewn and pressed in place, it’s time to trim the edges. Be mindful to keep the ¼” seam allowance along each piece (this is why it is particularly helpful to draw on the seam allowance for any pattern pieces that do not already include them before you begin sewing).
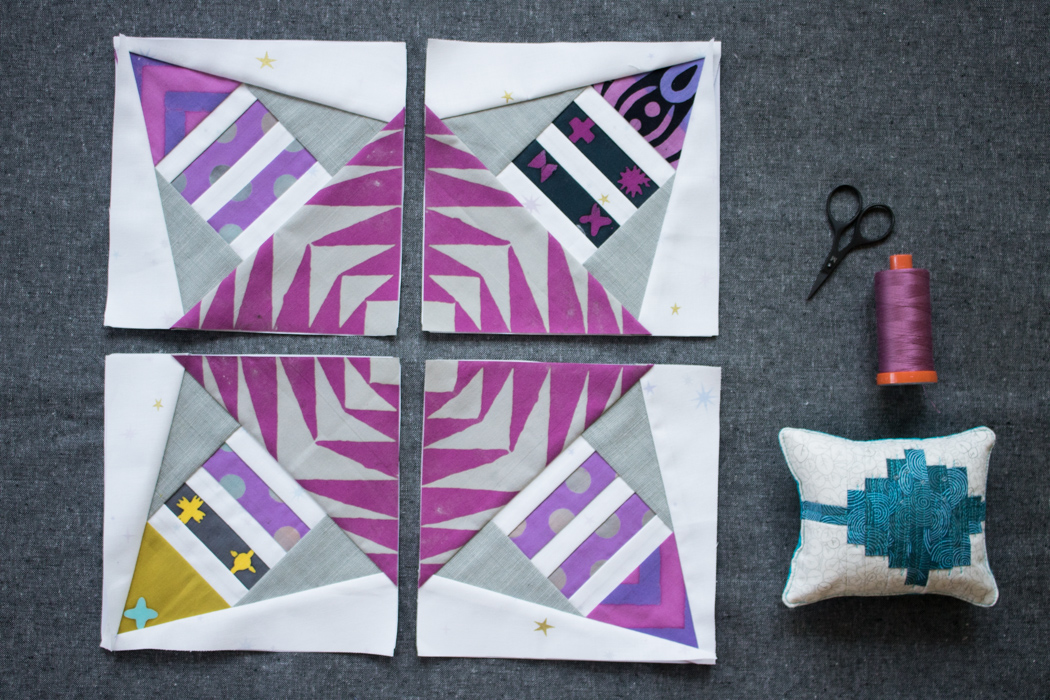
You’ve completed one quarter of a block! Make three (3) more according to your color plan. Trust me, the more you practice foundation paper piecing (grab fabric, line up, sew, fold & trim, press. Repeat.) the smoother it goes. By the time you are finished with the Constant Flux quilt, you will have it down!
Once you have all four quadrants of a block sewn, it’s time to join the pieces. I like to keep the paper on while joining the different components of a block, since following the ¼” seam allowance is easy when you can just sew along a line!
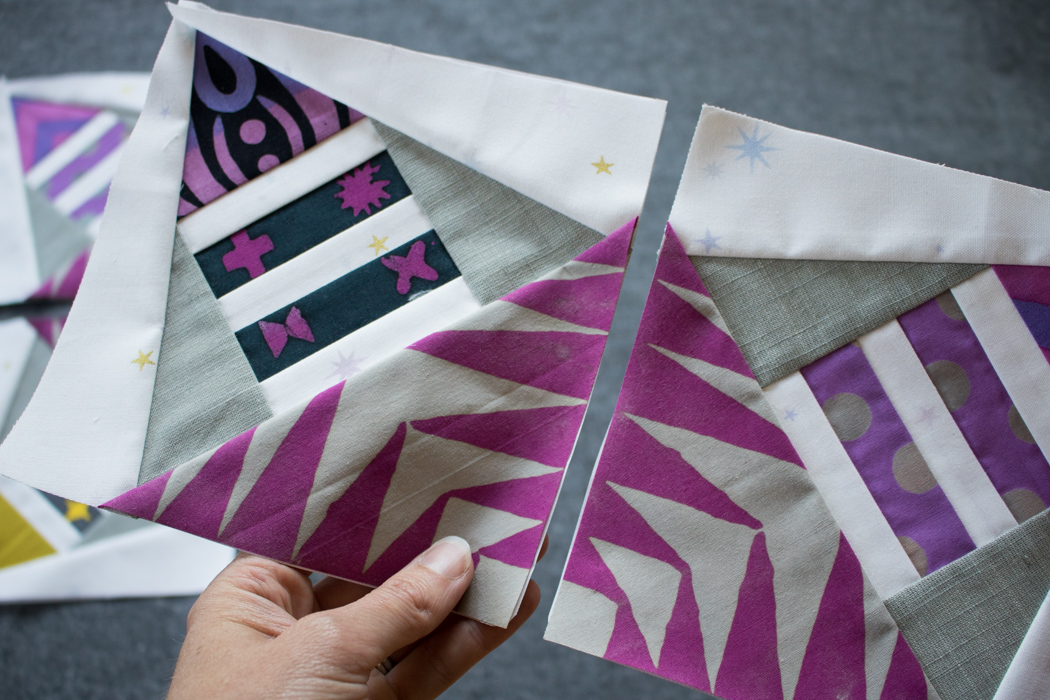
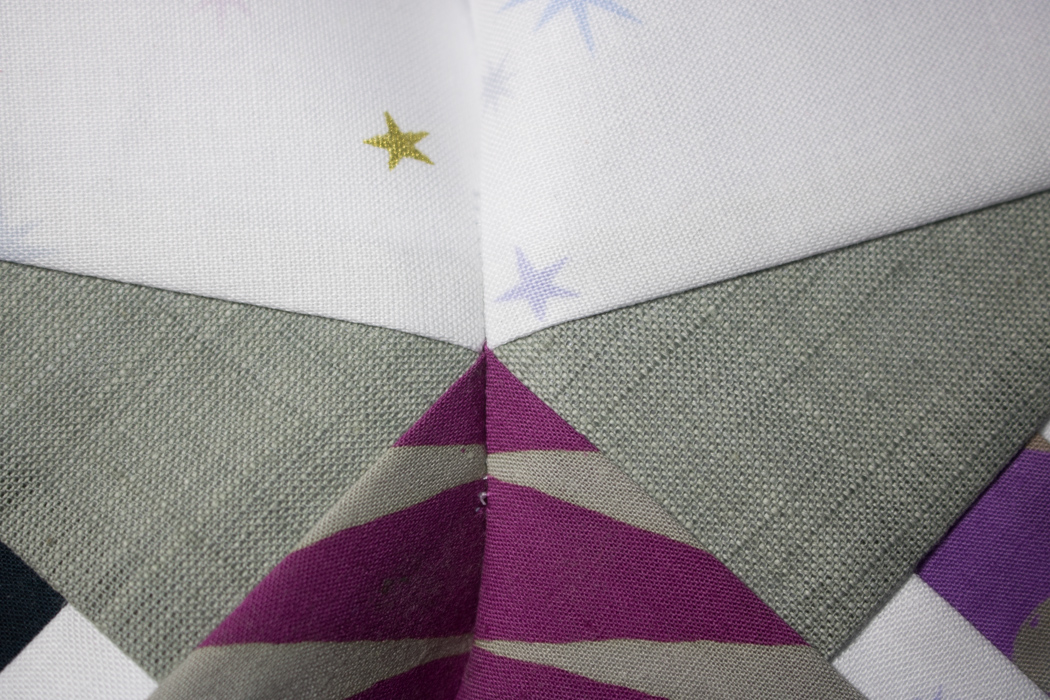
Grab the first two pieces you want to join and note any important seams you’ll want to match. For Constant Flux, there is one main seam that needs matching attention. I rarely pin in sewing, but this is a time when I always use a pin to help me get that match perfect.
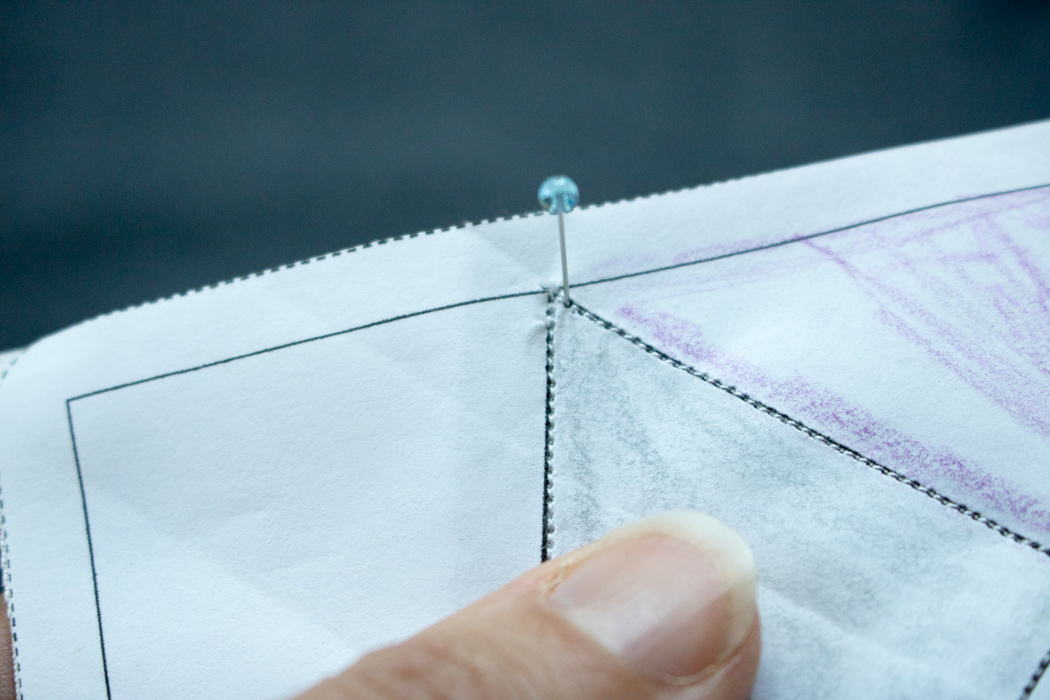
Here’s how. Identify the point that you want to match (my pin is pointing to it in the photo above. Note that I’m not putting the pin in from the right side, I’m simply showing the point we want to match.)
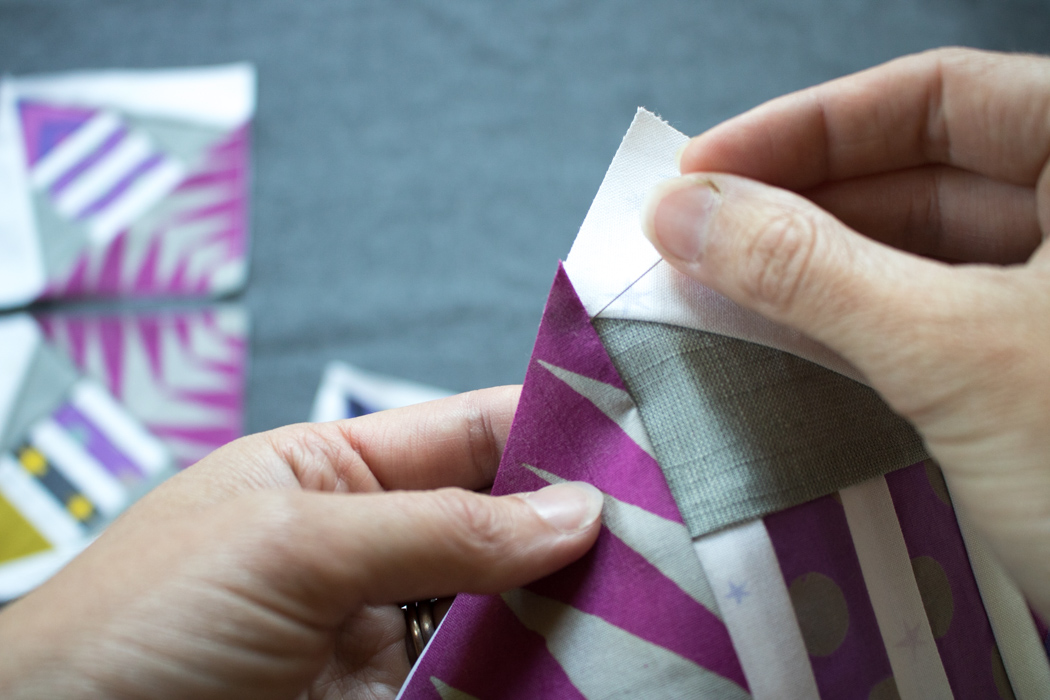
Inserting the pin into the wrong side of that pattern piece, extend the pin out from that exact point.
Then, insert the point of the needle directly into the matching point on the second piece. The pin will act as a direct link from point to point. Hold the pin perpendicular to the pattern pieces and line up your seam line.
Note that in theory, the pins would enter and exit exactly on the seam line intersection on the pattern pieces. However, depending on how crisply you press your fabrics, this point *might* be a bit offset. No worries! Just make mental note of where in relation to the line the pin is located and slightly adjust your seam accordingly. As long as they are all consistent, it will work out! I sewed my joining seam *just* inside the seam line, since the pin indicated that the seam match was a bit inside the seam line.
I don’t keep the pin in when sewing; I use it to perfectly match points, then firmly hold my two pattern pieces together and remove the pin. I’ve found that with the added bulk of the papers, actually pinning often will offset your seam rather than keep it perfectly together.
Accuracy tip: When you’re aiming to perfectly match seams, use the pin trick above to get your points lined up first.
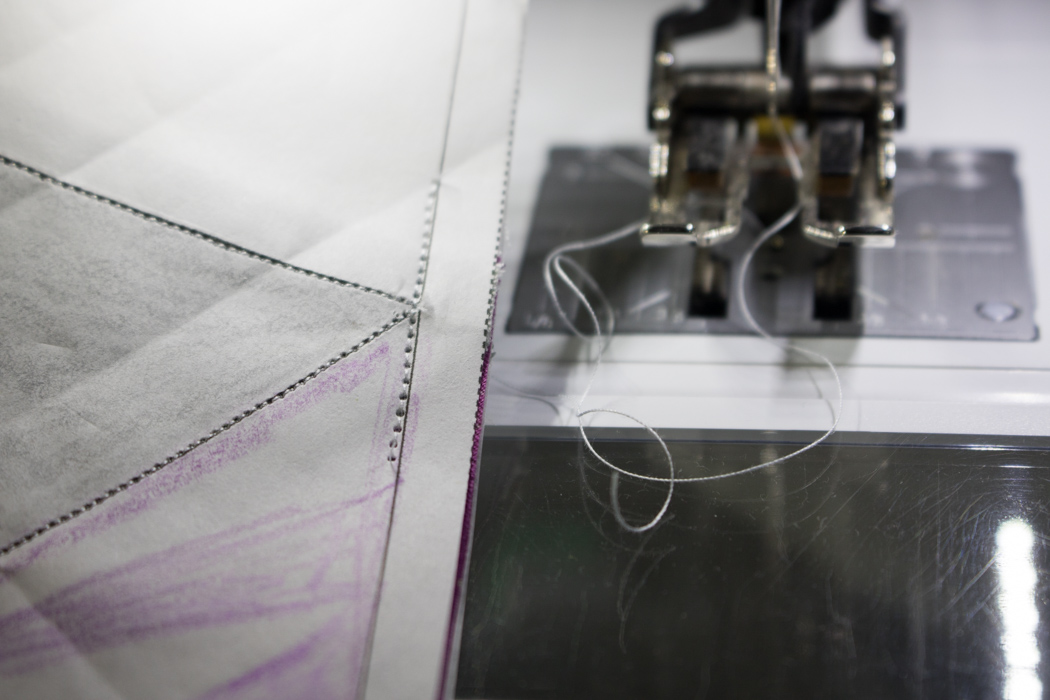
THEN, (and this part is important!) change your stitch length to 1.6 or 1.7 before stitching from a bit before until a bit after where you want your seams to match (shown in the photo above).
Check to make sure your seams match to your standards. THEN change back to a shorter stitch length and sew along the entire seam, sewing right over (or just outside) your tester seam. Trust me, you do NOT want to have to rip 1.2 stitch length stitches to fix a not quite matched point!!

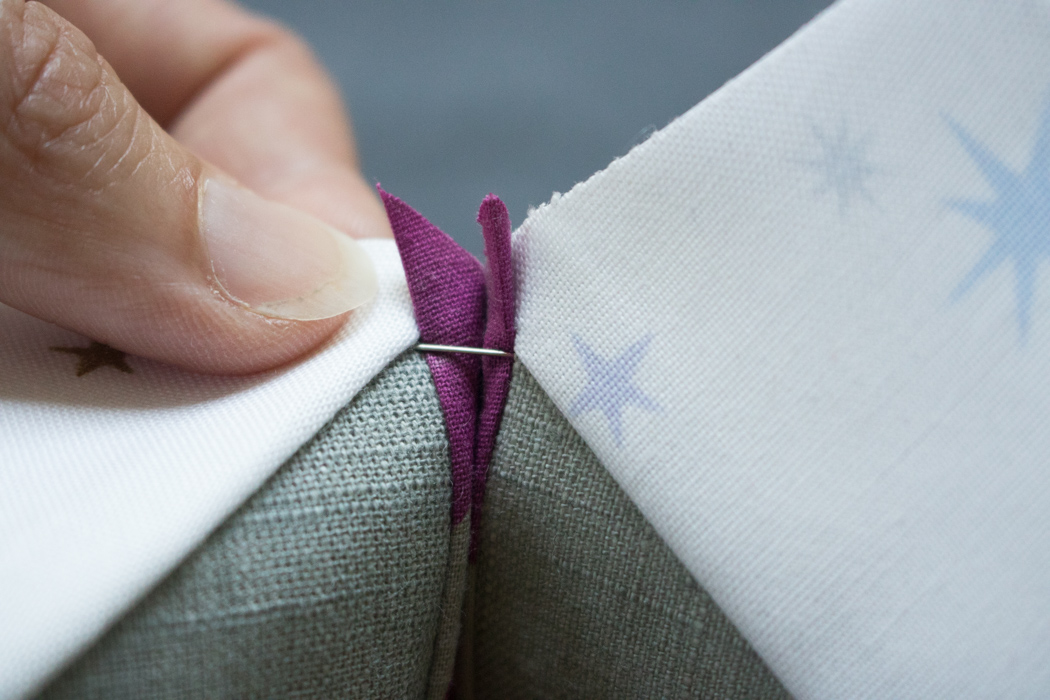
When sewing the two halves of the block together, remove just a bit of paper near the seam intersection and pin just after where the seams match. Use the same longer-length tester stitch over each seam match, then sew it all the way across. I like to keep the vast majority of the paper on until the entire quilt is together. It provides such a great foundation!
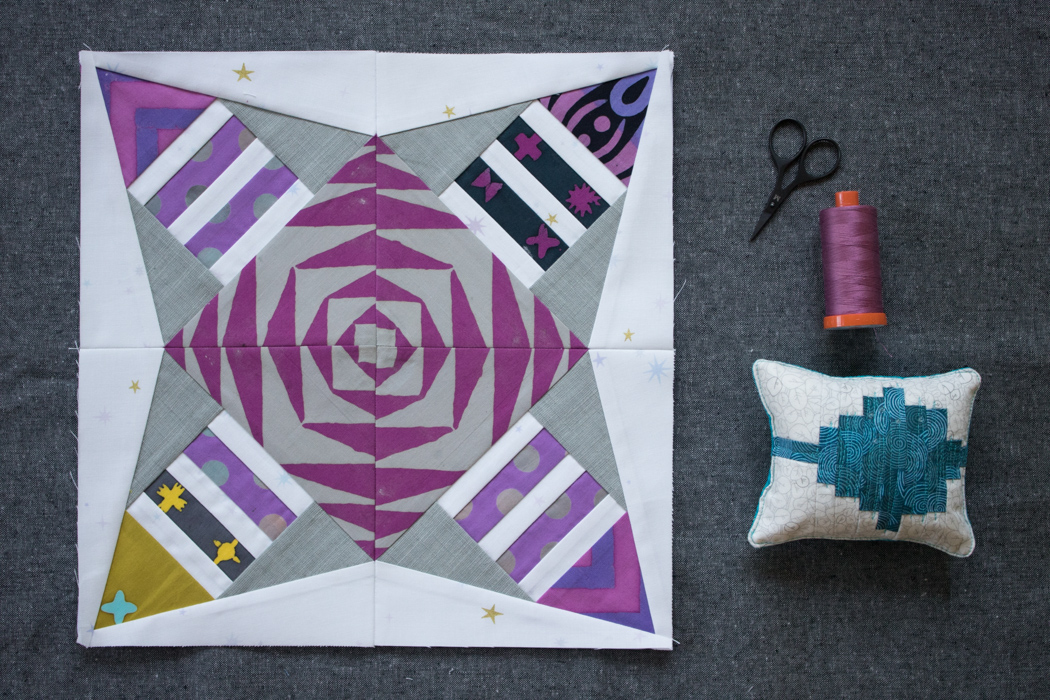
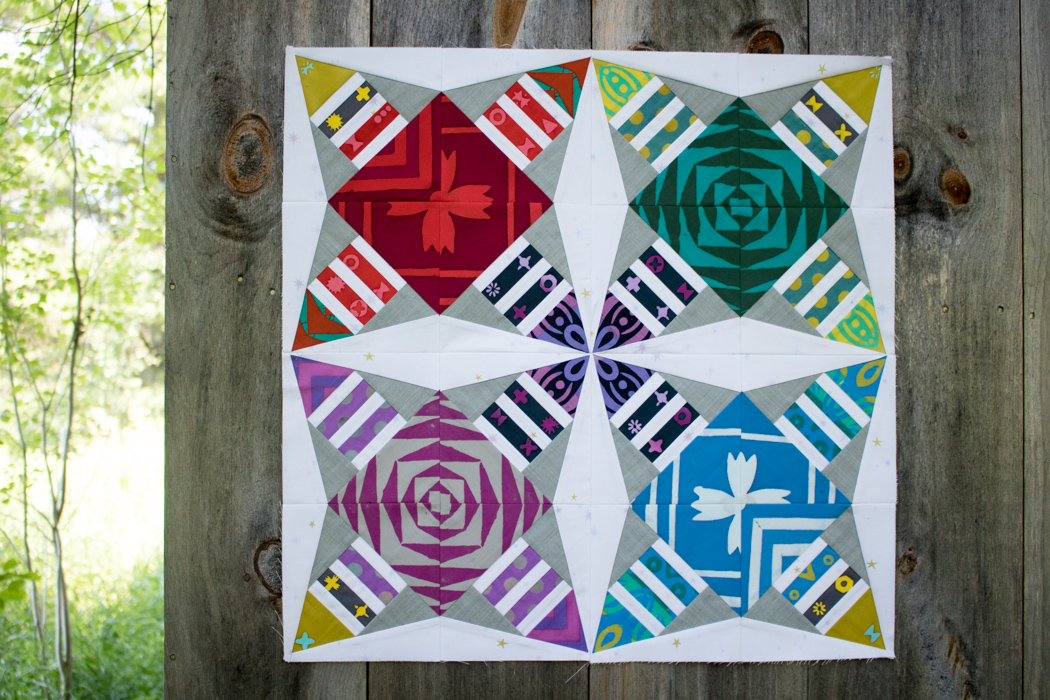
Ta da! You now have one full block together! Sew three (3) more to complete your Constant Flux quilt.
Now comes the fun part–removing the paper! To remove the paper, gently tear away, holding the main block in place and pulling gently away and to the side, similar to how you would tear any perforated piece of paper or remove a check from a checkbook. With your narrow stitch length, the paper should come away easily. Once one side of the paper is off, the other side often will just pop out. Go slowly and tear gently to ensure your seams stay tight. If you end up with bits of paper stuck in the seams, carefully use blunt tweezers to remove the final bits. Alternately, I’ve heard that spraying the paper with water helps with removal. I haven’t had to try it yet, though, so can’t vouch for the method. Take your time with removing the papers, reveling in those perfect points, the fun meticulously cut bits, and thinking about what foundation paper piecing pattern you will make next.
So now you’ve got the basics of foundation paper piecing! I share even more tips to make your foundation paper piecing experience as smooth as possible on my blog, so if you’re ready to tackle using directional fabrics, or a pattern with particularly tricky angles, check it out.
Many thanks to Andover for inviting me here today! I hope this tutorial was helpful, and that you enjoy paper piecing as much as I do. If you have any questions along the way, feel free to drop me an email at thenightquilter@gmail.com or contact me through my blog, Night Quilter. If you make a Constant Flux quilt, please use #constantfluxquilt and tag me @nightquilter so that I can see it, too! Happy stitching!
3 Responses to Foundation Paper Piecing with Kitty Wilkin